在Backstage中集成ArgoCD

在Backstage中集成ArgoCD

Zave Genshin Impact

注意
本文档基于 Backstage 1.32.0 版本编写,并采用自 1.24.0 版本以来官方推荐使用的新后端系统(New BackEnd System)。Backstage 仍处于不断更新发展中,本文下述步骤可能将不适用于后续更新版本。

一、开发前准备

  1. 确认完成 GitLab 与 Jenkins 的集成,详情请参阅相关文档:
  2. 确认 GitLab、ArgoCD、Harbor 能够互相 ping 通
  3. 为 ArgoCD 的 Admin 账户添加 apiKey 权限
  4. 开发参考文档:

二、接入ArgoCD插件

(1)安装支持插件

从项目的根目录开始:

1
yarn --cwd packages/app add @roadiehq/backstage-plugin-argo-cd

(2)导入插件到前端

编辑 packages/app/src/components/catalog/EntityPage.tsx:

1
2
3
4
5
6
7
8
9
10
11
12
13
14
15
16
import {
EntityArgoCDOverviewCard,
isArgocdAvailable
} from '@roadiehq/backstage-plugin-argo-cd';

const serviceEntityPage = (
<EntityLayout.Route path="/argocd" title="ArgoCD">
<EntitySwitch>
<EntitySwitch.Case if={e => Boolean(isArgocdAvailable(e))}>
<Grid item sm={4}>
<EntityArgoCDOverviewCard />
</Grid>
</EntitySwitch.Case>
</EntitySwitch>
</EntityLayout.Route>
);

(3)为ArgoCD添加代理配置

编辑 app-config.yaml:

1
2
3
4
5
6
7
8
proxy:
'/argocd/api':
target: https://argocd.xxxx.com.cn/api/v1
changeOrigin: true
# only if your argocd api has self-signed cert
secure: false
headers:
Cookie: $env:ARGOCD_AUTH_TOKEN

此处的 ARGOCD_AUTH_TOKEN 对应在 Backstage 部署的服务器中添加一个永久的环境变量。如何在 Linux 环境中添加永久环境变量此处不再赘述。

(4)为单个项目添加ArgoCD配置

编辑 examples/template/content/catalog-info.yaml:

1
2
3
4
5
6
7
8
9
apiVersion: backstage.io/v1alpha1
kind: Component
metadata:
name: ${{ values.name }}
annotations:
# ...others
argocd/app-name: ${{ values.name }}
spec:
#...others

具体含义可以参考这篇文章:在Backstage中集成Jenkins

此时,ArgoCD 服务的接入算是圆满完成了。接下来将要根据本内部开发者平台的需求,对 ArgoCD 服务进行一些定制。

三、创建自定义操作脚手架用于为项目创建对应 Application

(1)新建并整理操作脚手架模板

具体步骤可以参考这篇文章:在Backstage中集成Jenkins

(2)编写操作脚手架业务逻辑

新建 argocd.ts:

1
2
3
4
5
6
7
8
9
10
11
12
13
14
15
16
17
18
19
20
21
22
23
24
25
26
27
28
29
30
31
32
33
34
35
36
37
38
39
40
41
42
43
44
45
46
47
48
49
50
51
52
53
54
55
56
57
58
59
60
61
62
63
64
65
66
67
68
69
70
71
72
73
74
75
76
77
78
79
80
81
82
83
84
85
86
87
88
89
90
91
92
93
94
95
96
97
98
99
100
101
102
103
104
105
106
107
108
109
110
111
112
113
114
115
116
117
118
119
120
121
122
123
124
125
126
127
128
129
130
131
132
133
134
135
136
137
138
139
140
141
142
143
144
145
146
147
148
149
150
151
152
153
154
155
156
157
158
159
160
161
162
163
164
165
166
167
168
169
170
171
172
173
174
175
176
177
178
179
180
181
182
183
184
185
186
187
188
189
190
191
192
193
194
195
196
197
198
199
200
201
202
203
204
205
206
import { createTemplateAction } from '@backstage/plugin-scaffolder-node';
import myCache from '../../../../packages/global/node-cache';

export function createExampleAction() {
// For more information on how to define custom actions, see
// https://backstage.io/docs/features/software-templates/writing-custom-actions
return createTemplateAction<{
// 在此处,你需要声明本文件要用到的参数名称以及对应的类型
name: string;
repoUrl: string;
GitLab_Username: string;
GitLab_Personal_Access_Token: string;
Kubernetes_Env: string;
}>({
id: 'acme:argocd:create',
// 此处也需要创建一个唯一值,用于在编写软件模板时指定是使用什么action
description: 'create a app in argocd',
// 一些必要的说明
schema: {
input: {
type: 'object',
required: ['name', 'repoUrl'],
// 参照上面声明的参数进行填充并在下面进行说明
properties: {
name: {
title: 'An example parameter',
description: "This is an example parameter, don't set it to foo",
type: 'string',
},
repoUrl: {
title: 'A target project url',
describe: 'a gitlab repoUrl',
type: 'string',
},
GitLab_Username: {
title: 'gitlab username',
describe: 'your gitlab username',
type: 'string',
},
GitLab_Personal_Access_Token: {
title: 'GitLab_Personal_Access_Token',
describe: 'your GitLab_Personal_Access_Token',
type: 'string',
},
Kubernetes_Env: {
title: 'KUBE NAMESPACE',
describe: 'KUBE NAMESPACE',
type: 'string',
},
},
},
},
async handler(ctx) {
ctx.logger.info(
`Running example template with parameters: ${ctx.input.name}`,
);

const userInfo = await ctx.getInitiatorCredentials();
const userEntityRef = userInfo.principal.userEntityRef;
const name = userEntityRef.split('/').pop();

// 解析repoUrl
const url = new URL('https://' + ctx.input.repoUrl);
const params = new URLSearchParams(url.search);
const owner = params.get('owner')?.toLocaleLowerCase(); // gitlab项目的owner
const repo = params.get('repo'); // gitlab项目的名称

// 要修改为从配置中读取,而不是明文声明
const projectUrl = `https://gitlabcode.xxxxx.com.cn/${owner}/${repo}.git`;
const ARGOCD_BASE_URL = 'https://argocd.xxxxx.com.cn';
const tenantId: string = 'xxxxxxxxxxx';
const client_id = 'xxxxxxxxxxx';
const client_secret = 'xxxxxxxxxxxx';
const MICROSOFT_LOGIN_BASE_URL = `https://login.microsoftonline.com/${tenantId}/oauth2/v2.0/token`;
const GITLAB_TOKEN = ctx.input.GitLab_Personal_Access_Token;
const username = ctx.input.GitLab_Username;
const kube_namespace = ctx.input.Kubernetes_Env.toLocaleLowerCase();

let ARGOCD_AUTH_TOKEN = "";

// 获取当前登录的AD账号下的refresh_Token
let refresh_Token: string | undefined = myCache.get(`${name}_refreshToken`);
let id_token = "";

try {
const params = new URLSearchParams({
client_id: client_id,
client_secret: client_secret,
grant_type: 'refresh_token',
redirect_uri: 'https://argocd.xxxxx.com.cn/auth/callback',
scope: 'openid profile offline_access'
});

if (refresh_Token) {
// 确保 refresh_Token 不是 undefined
params.append('refresh_token', refresh_Token);
}

const response = await fetch(`${MICROSOFT_LOGIN_BASE_URL}`, {
method: 'POST',
headers: {
'Content-Type': 'application/x-www-form-urlencoded',
},
body: params.toString()
});

if (!response.ok) {
throw new Error(`Fail to connect to Microsoft login site, Status: ${response.status}`);
}

const data = await response.json();
id_token = data.id_token;
refresh_Token = data.refresh_token;
} catch (error) {
myCache.set(`${name}_refreshToken`, refresh_Token, 0);
ctx.logger.error('Error connect to Microsoft login site:', error);
throw error;
}

// 获取账户session(使用admin账号时的备选方案)
// try {
// const data = {
// password: "xxxxxxxxx",
// username: "admin"
// };
// const response = await fetch(`${ARGOCD_BASE_URL}/api/v1/session`, {
// method: 'POST',
// headers: {
// 'Content-Type': 'application/json',
// 'Accept': '*/*',
// },
// body: JSON.stringify(data)
// });
// if (!response.ok) {
// throw new Error(`Failed to create session. Status: ${response.status}.`);
// }
// const res = await response.json();
// ARGOCD_AUTH_TOKEN = res.token;
// } catch (error) {
// ctx.logger.error('Error creating session:', error);
// throw error;
// }

// 创建一个repository
try {
const data = {
repo: projectUrl,
type: "git",
username: username, // Git仓库用户名
password: GITLAB_TOKEN, // Git仓库密码或令牌
};
const response = await fetch(`${ARGOCD_BASE_URL}/api/v1/repositories`, {
method: 'POST',
headers: {
'Content-Type': 'application/json',
'Accept': '*/*',
'Authorization': `Bearer ${id_token}`
},
body: JSON.stringify(data)
});
if (!response.ok) {
throw new Error(`Failed to create repository. Status: ${response.status}.`);
}
} catch (error) {
ctx.logger.error('Error creating repository:', error);
throw error;
}

// 创建一个application
try {
const data = {
metadata: {
name: ctx.input.name
},
spec: {
project: "default",
source: {
repoURL: projectUrl,
targetRevision: "HEAD",
path: "argocd-yaml"
},
destination: {
server: "https://xxxxxxxxxx",
namespace: kube_namespace
}
}
};
const response = await fetch(`${ARGOCD_BASE_URL}/api/v1/applications`, {
method: 'POST',
headers: {
'Content-Type': 'application/json',
'Accept': '*/*',
'Authorization': `Bearer ${id_token}`
},
body: JSON.stringify(data)
});
if (!response.ok) {
throw new Error(`Failed to create application. Status: ${response.status}.`);
}
} catch (error) {
ctx.logger.error('Error creating application:', error);
throw error;
}
},
});
}

在这里的例子中,按照非注释内容走通的逻辑为:由于 ArgoCD 完成了对 Microsoft Azure 的集成,用户可以使用 Azure 账号进行登录,我们在登录 Backstage 时也是用的 Azure 账号登录,那么就可以使用登陆时存储的本账号的 refresh_token,获取 id_token,并通过这个 id_token 完成下面一系列的操作。

注释的内容表示:当需要使用 admin 账号时,admin 账号没有 refresh_token 这一说法,那么就需要使用 ArgoCD 自带的 session 来调用 API。

(3)修改其他文件

新建 module.ts:

1
2
3
4
5
6
7
8
9
10
11
12
13
14
15
16
17
18
19
20
21
import { createBackendModule } from "@backstage/backend-plugin-api";
import { scaffolderActionsExtensionPoint } from '@backstage/plugin-scaffolder-node/alpha';
import { createExampleAction } from "./actions/argocd";

/**
* A backend module that registers the action into the scaffolder
*/
export const ArgoCDScaffolderModule = createBackendModule({
moduleId: 'argocd-create-app',
pluginId: 'scaffolder',
register({ registerInit }) {
registerInit({
deps: {
scaffolderActions: scaffolderActionsExtensionPoint
},
async init({ scaffolderActions }) {
scaffolderActions.addActions(createExampleAction());
},
});
},
});

新建 index.ts:

1
export { ArgoCDScaffolderModule as default } from './module';

和之前的 Jenkins 集成相关文章所提到的一样,这里也需要做出一些命名方面的修改。

至此,整个 ArgoCD 服务逻辑的定制也算是完成了。

四、调用自定义操作脚手架

在软件模板的步骤中添加:

1
2
3
4
5
6
7
8
9
- id: create-argocd
name: Create ArgoCD application
action: acme:argocd:create
input:
name: ${{ parameters.name }}
repoUrl: ${{ parameters.repoUrl }}
GitLab_Username: ${{ parameters.GitLab_Username }}
GitLab_Personal_Access_Token: ${{ parameters.GitLab_Personal_Access_Token }}
Kubernetes_Env: ${{ parameters.Kubernetes_Env }}

道理也和 Jenkins 集成相关文章的第五部分所提到的一致,这里就不再赘述了。

通过上述内容,在创建项目时,将会在 ArgoCD 服务器中创建与项目相同命名的 application,并配置好所连接的 GitLab 项目以及 Kubernetes 集群,以便于当 Jenkins 触发构建时能够顺利部署。

五、一些首次开发时尚待解决的问题

1. 前端展示页面 401 权限问题

前端展示页面尚存在 401 权限问题,编者认为较大概率是 ArgoCD 相关配置文件数据填写不正确;其次可能是 Token 及其环境变量配置不正确;当然也不能排除由于本系统基于新后端系统开发,而该 ArgoCD 插件是使用旧的后端系统开发,所导致的可能的兼容性问题。

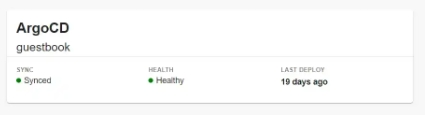
目前可行的解决方案:该插件仅仅只是用于展示每一个项目所关联的 application 的同步情况、健康情况、上一次发布时间。因此我们完全可以通过上面开发 ArgoCD 定制操作脚手架的经验,使用 REST API 来自己定制一个页面组件。

ArgoCD插件前端展示示例

ArgoCD插件前端展示示例

  • 标题: 在Backstage中集成ArgoCD
  • 作者: Zave
  • 创建于 : 2026-09-05 12:00:00
  • 更新于 : 2026-09-05 12:00:00
  • 链接: https://zavex.cn/post/202.html
  • 版权声明: 版权所有 © Zave,禁止转载。
评论